Bagpipes Documentation
BagPipes an opensource application that lets you create workflows in a drag and drop style interface in order to build execution flows of cross chain assets transfers using XCM.
You can enjoy a public instance of Bagpipes here:
https://xcmsend.com
A development instance can be found that:
https://alpha.bagpipes.io
Name change:
We are in the process of changing the name from XCMSend to Bagpipes.
Build XCMSend locally:
$ git clone git@github.com:XcmSend/app.git
$ cd app/
$ npm install -f
$ npm run build
Run:
$ npm run dev
Supported wallets:
Note:
We recommend and test most features with Polkadot.js browser wallet.
Links:
XCMSend github repo
Intro to XCM
Definitions
It is worth quickly browsing over these bagpipes definitions and terms, as they will give you an idea of what you can do with Bagpipes.
Nodes
In Bagpipes, nodes are objects you can drag on to the canvass. A node can be connected to other nodes to form a workflow of nodes.
Edges
Edges are what connect nodes together. Nodes can be connected to each other with edges to form a workflow.
Scenario
A Scenario is a workflow of nodes and edges. You can have multiple scenarios, that are saved for you in Lab. "Workflow", "flow" or "scenario" can be used interchangably, the official term is scenario, as each scenario has a scenario_id.
Executions
An execution is a single run-through of operations within a scenario. A scenario can have more than one execution. An execution can be a complete run through or it may be a single node execution. Executions are saved in Lab. Just click on a scenario and it will show you its respective executions.
Pills
Pills are small draggable key elements that represent key values. When you receive data from upstream that is in an expected structure you can use pills to represent variables.
Persist a Scenario
You can persist your scenario, which then turns it into an app that is always running. The persisted scenario can be scheduled to run periodically or it triggers based on a webhook trigger and some other conditions that you may set.
Node Types
Here are a list of nodes, which each have a different purpose.
1. Chain Node
A chain node is an object that represents a blockchain. A chain node needs to be used in conjuction with an Action Node. A chain node represents either the source or the destination in relation to an action.
2. Action Node
You can drag in an action node between two chains, the action is either xTransfer or Swap.
Actions
Actions are otherwise referred to as blockchain transactions or extrinsics, which is something that is signed by a user and put on-chain.
xTransfer
xTransfer = Cross chain transfer
xTransfer is an action that represents transferring assets across chains. xTransfer can be a teleport, or a reserve asset transfer, etc.
Swap
Swap = Selling on asset for another asset on a decentralized exchange.
Note: we currently only support HydraDx to HydraDx swaps at the moment.
3. Webhook Node
A webhook node allows you to receive data. A webhook can only be used at the beginning of the workflow. Just generate a webhook endpoint URL, send some data there (via an http request using cURL, or Postman, etc), then when the event object data is received it can be and used your workflow. The event can also trigger you workflow to activate.
4. HTTP Node
A HTTP allows you to make almost any kind of HTTP(s) request on the internet! When you use this node to make an HTTP request, the response data (or event data) can be used in your workflow. It's a very powerful node that unlocks a lot of possibilities.
Basic workflow
XCMSend allows you to easily create transactions flows of sending assets accross the polkadot connected chains and swapping them for other assets.
Lets create a workflow!
Tips:
In order to quickly delete a node you can press the node with your mouse and press backspace in order to easily delete it.
Intro:

If we start XCMSend for the first time you will be prompted by the welcome screen.
Select wallet:

We want to select a browser wallet that we have on the browser we are using. For this example I'm gonna select polkadot.js browser extension.
Create scenario:

Once we have selected a wallet, we want to create are first scenario.
Lab:

This is our whiteboard and lab enviroment, here you can build your workflows.
Chain node:

We want to add a source chain to our workflow as a first piece.
Add first chain:

Drag in the chain box and select which chain you want to use.
Add Action:

Every work flow consists of a source chain, an action and a destination chain. Lets add another chain and then an action inbetween them. For this example we are going to use xTransfer.
First xtransfer:

Select either swap or xTransfer, in this example we want to send an asset from the source to the destination chain.
Select asset from source chain:

Select which onchain asset you want to send tto the destination chain from the first source chain node.
Add another action to continue to flow:


Congratulations! You have created your first part, you can drag in more boxes and continue to develop your application flow.
Add a swap:

We are now familiar with creating cross chain transfers with xtransfers we can add a swap. Select asset you want to swap from the first chain box, and the destination asset you want to get on the destination node.
Note: We currently only supports dex interaction with HydraDx's omnipool. Meaning that swaps are only possible from HydraDx to Hydradx. If you want to continue the transaction flow, you can simply drag in a xtransfer action and send the asset to another chain.
Head back to /lab

Congratulations! You have created your first scenario. All scenarios you create are stored in a browser cookie and you can return to the /lab section to view and edit them.
xTransfering assets cross chain
Right now XcmSend supports the following transfers:
hydradx > assethub
hydradx > polkadot

assethub > polkadot
assethub > hydradx

assethub > interlay

polkadot > hydradx
polkadot > assethub
Polkadot cross chain xtransfer
If you want to send cross chain transfers from or to polkadot you can do so we XCMSend.
Note:
Polkadot does not implement the same architecture for storing assets such as assethub or other parachains. Limiting the functionality to only being able to send the native currency(DOT) to other chains with a xtransfer action.
Polkadot DOT to AssetHub:
Polkadot Dot to AssetHub video:

DOT to HydraDX:

Dot to HydraDX video:
Recommended XCM compatible block explorer:
Asset Hub xTransfer
Asset Hub is a polkadot connected parachain. Using the xTransfer option in the Action box you can simply send one asset from assethub to another chain.
Assethub > Polkadot:

Assethub > HydraDx:

Assethub > Interlay
Links:
Recommended AssetHub XCM compatible blockexplorer:
https://assethub-polkadot.subscan.io/
HydraDx xTransfer
HydraDx > Polkadot:

HydraDx > Polkadot video:
Send an asset from HydraDx to Polkadot.
HydraDx > AssetHub:

HydraDx > Polkadot video:
Send an asset from HydraDx to AssetHub.
Recommended block explorer:
Interlay
Assethub > Interlay XCM asset tranfers is currently supported

Note:
Interlay > Assethub is not yet supported
DOT > Interlay Intr token:
- 1: Bridge dot > HydraDx
- 2: Swap DOT in omnipool for Intr
- 3: access app.interlay.io, Got geoblocked :(
- 4: Tunnel traffic through Estonia
- 5: access app.interlay.io and bridge intr from HydraDx > interlay
With our future HydraDx swap feature, future user will be able to do this with one scenario in XCMSend.
Swap
HydraDx asset swaps is avaliable! XCM your desired asset to HydraDX and use the swap feature to sell your asset for another.
Find out how to interact with HydraDX DEX swaps on next page.
HydraDx swap
You can swap one asset for another using HydraDx's omnipool DEX.
Supported pools:
- Omnipool
- XYK
- LBP
- Stable
Swaps are supported from HydraDX to HydraDX. We use HydraDx's SDK to generate the best swap route for your swap.
How to:
Drag in one action node, a source chain and a destination chain:

Note: You can expand your workflow and drag in more xcm actions from other chains.
Select the asset you want to swap and set the source destination. After that, press draft and Bagpipes will generate the extrinsics.

If all looks good, we want to press approve, sign it with our browser wallet and broadcast it to the chain!

Use a block explorer as hydradx.subscan.io to check if the transaction was successful.
Chain Node
Webhook Node
-
A webhook node allows you to receive data from anywhere.
-
A webhook can only be used at the beginning of the workflow.
-
Just generate a webhook endpoint URL, send some data there (via an http request using cURL, or Postman, etc), then when the event object data is received it can be and used your workflow.
-
The event can also trigger you workflow to activate.

Above is a webhook node that has been dragged on to the canvas.
1. Create a Webhook Endpoint

Create and name a webhook endpoint.
2. Activate the Webhook.
To active this endpoint you need to send it some data. It's important what data you send it because the data structure is saved and can be used by downstream nodes in the form of pills.
Click "Start Listening"
Http Node
User Profile (Avatars)
List of potential future users that we will use bagpipes with the future functionality.
Avatars:
Jan (“Media DAO”):

Is a key member of a DAO that works in Web3 media, he has to do payroll, he stakes, and does some trading. He loves to hack productivity and finds ways to reduce repetitive tasks through automation.
Things Jan builds:
A “Twitter Bot” workflow that queries for new referendums, “turning” referendums, interesting comments and delegations to and then uses Chat GPT to curate a witty tweet, and then sends the tweet to users.
He creates a Bagpipe to trigger a multisig transaction when funds arrive into the multisig from a treasury. He shares the bagpipe link with others so they can sign it with ease.
He pays multiple addresses in one signing ceremony with a bagpipe
June (“Web3 Creator Community”)

June has built a creator platform along with her comrades, which have a web3 component attached, allowing for creators on the platform to design web3 memberships and NFTs for earning. She use Bagpipes as middleware, which turns her website into a DApp, which adds functionality with ease, saving her community the need to hire full-time engineers.
Julio (“Dapp builder”)

Julio is a product developer and Dapp builder who builds and maintains client projects. He creates bagpipes and then generates API endpoints and connects it to the Dapps he builds for clients.
Jessica ("Developer Advocate")

Jessica works in the web3 space as a developer advocate, helping people build in the ecosystem.
She maintance a public documentation wiki for her project.
In order to help new users in the how-to section, she creates a scenario in bagpipes for each guide and leaving the link where the user can execute the transaction. She use this for the XCM transfer section and for using various pallet functions in a userfriendly and abstracted way.
Jasper ("Community manager")

Jasper is a community manager, and maintain a discord and telegram project channel. Everytime someone asks how to send an asset from one chain to another with XCM he uses a bagpipe bot to generate a link to the scenario, the user can use
<user> how do i send USDT from assethub to hydra and swap it for dot then to polkadot ?
<Jasper> !bagpipes USDT > assethub > hydradx SWAP DOT > polkadot
<bagpipes_bot> Here is a link to an XCM asset transfer:
Sending assetid: 1984
Transaction to send asset id 1984 from assethub to hydra
then swap to DOT and forward to polkadot.
View and broadcast the transaction here:
https://app. xcmsend . com /create=linkhere
<Jasper> user: you can use the above link and sign it with your browser wallet
Jasper use a bot connected to bagpipes api in order to quickly answer common transaction questions that the community has.
Jasmine ("Project Manager")
Jasmine is project manager and use bagpipes to quickly build MVP XCM applications and testing multichain pallet
Jasmine is a seasoned project manager with a flair
for innovation.
She utilizes Bagpipes to streamline her
workflow, swiftly constructing MVP XCM applications
and conducting test transactions with various pallets.
With a keen eye for detail and a knack for
effective collaboration, Jasmine leverages
Bagpipes to effortlessly bring her vision to life,
enabling her to describe compelling cross-chain
applications with confidence.
The drag-and-drop functionality empowers her to experiment with diverse application interactions, ensuring that every component fits seamlessly into the larger picture. Through Bagpipes, Jasmine transforms complex technical processes into an intuitive and user-friendly experience, making her a driving force in the successful development of cutting-edge web3 applications.
Jonathan ("Dotsama enthusiast")

Jonathan runs a validator and votes in opengov on behalf of others.
He use bagpipes to generate links where people can nominate to his validator and delegate DOT to him.
Share your workflow
You can easily share your scenario with everyone using the copy link function:
-
Go to Lab:

-
Press copy link button:
 This will automatically save the link to your clipboard so you can easily paste it.
 -
Share it with the world!
Contribute:
Have you created a useful scenario? Add it to this guide by creating a new issue on our github: github.com/XcmSend/xcmsend.github.io/
Head to the next page in order to find premadetemplates we have made for you.
Templates
DOT > USDT
Deployments
Public instances
List of XCMSend public instances:
Contribute:
You can add your public instance of XCMSend by submitting a pr here:
https://github.com/XcmSend/xcmsend.github.io
Run your own instance
Deploy on Debian linux
Requirements:
- Node.js and npm
- git
- 3 gigabyte or more free (harddrive)disk space
Diskspace needed:
Amount of disk space consumed after installing:
$ user@debian:/tmp$ du -sh app-v0.0.1
1.5G    app-v0.0.1
Install npm on Debian:
We recommend that you use a npm version that is later than 8.5, in order to get a later version on debian, add the nodejs package mirror and upgrade your local nodejs version:
$ sudo apt-get update
$ sudo apt-get install -y ca-certificates curl gnupg
$ sudo mkdir -p /etc/apt/keyrings
$ curl -fsSL https://deb.nodesource.com/gpgkey/nodesource-repo.gpg.key | sudo gpg --dearmor -o /etc/apt/keyrings/nodesource.gpg
$ echo "deb [signed-by=/etc/apt/keyrings/nodesource.gpg] https://deb.nodesource.com/node_$NODE_MAJOR.x nodistro main" | sudo tee /etc/apt/sources.list.d/nodesource.list
$ sudo apt-get update
$ sudo apt-get install nodejs -y
Step 1:
Clone repo:
$ git clone https://github.com/XcmSend/app.git
Install with npm:
$ cd app/
$ npm install -f
$ npm run build
Note: Make sure you run a version of nodejs that is more later than 8,5.
Step 2:
Run the local instance
$ npm run dev

> @bagpipes/xcm-send@0.0.3 dev
> yarn build:tailwind && vite

yarn run v1.22.19
$ npx tailwindcss -c ./tailwind.config.js -i ./src/index.css -o dist/output.css
  VITE v4.4.9  ready in 9429 ms

  ➜  Local:   http://localhost:5173/
  ➜  Network: use --host to expose
  ➜  press h to show help
Paste 'http://localhost:5173/' into your browser and your ready to use bagpipes.
Step 3(optimal):
In step 2 you learned how to run a local instance of XCMSend. If you want people to be able to access it publicly we need to forward incoming connections to our XCMSend instance that is located at: 127.0.0.1:5173.
Run a public instance
A popular way to deploy XCMSend would be to let the Nginx webserver reverseproxy the connections to the local instance.
Install nginx
apt install nginx
Enable nginx to auto start
$ systemctl enable nginx
Set configuration file /etc/nginx/sites-available/nginx.conf:
server {
    listen 8080;
    server_name localhost;

    location / {
        proxy_pass http://127.0.0.1:5173;
        proxy_set_header Host $host;
        proxy_set_header X-Real-IP $remote_addr;
        proxy_set_header X-Forwarded-For $proxy_add_x_forwarded_for;
    }

    location /static/ {
        alias /usr/src/app/app-v0.0.1/static/;
    }

    location /media/ {
        alias /usr/src/app/app-v0.0.1/media/;
    }

}
Restart nginx:
$ systemctl restart nginx
Run in docker
In order to run docker on port 8080, do the following.
Build the docker image locally(recommended):
git clone https://github.com/XcmSend/DockerBuild
cd DockerBuild/
docker build -t xcmsend .
Build your own docker image based on the latest code in the main branch.
Download from Dockerhub
$ docker pull xcmsend/xcmsend:v0.1.0
Run
$ docker run -d -p 8080:8080 xcmsend
Troubleshooting
Best pratices for troubleshooting and debugging Bagpipes.
Reset:
In order to quickly reset, we recommend that you clear your browser cookies for Bagpipes site and reload the site.
Rebuild:
rm -rf node_modules/ && npm run build -f
Linux:
file watcher limit:
If you get the following error:
Error: ENOSPC: System limit for number of file watchers reached, watch ''
at FSWatcher. (node:internal/fs/watchers:244:19)
at Object.watch (node:fs:2264:34)
This means that you need to increase your linux file watcher limit size. Do this by increasing the number in the file: /proc/sys/fs/inotify/max_user_watches.
Ask for support:
Testing Guide
XCMSend comes prepackaged with test that dry run the functionality.
Run tests:
$ git clone https://github.com/XcmSend/app.git
$ cd app/
$ npm install
$ npm run test
> @bagpipes/xcm-send@0.0.3 test
> npx tsx src/run_tests.ts

Running tests
Running Balance tests
Testing assethub balance
assethub balance ok
Checking polkadot balance checks
polkadot native balance check ok
Testing Hydradx asset balance
Hydradx asset balance ok
running transaction tests
[test] Polkadot transfers
Polkadot DOT > assethub OK
Polkadot DOT > hydradx OK
[test] AssetHub transfers
Assethub > hydradx ok
[test] assethub > polkadot
Assethub > Polkadot ok
[test] HydraDx transfers
Hydradx > assethub ok
[test] Hydradx > polkadot
Hydradx > polkadot ok
testing interlay
assethub > interlay
[assethub2interlay]:  0xe64afe6914886cdcfea8da5f13e1e21aa11876cfe7fdde9299bbcdbbdc3a8b19
0x0901041f0803010100c11f0300010100e64afe6914886cdcfea8da5f13e1e21aa11876cfe7fdde9299bbcdbbdc3a8b190304000002043205011f000208af2f0000000000
assethub > interlay ok
interlay > assethub
0x84045e0001c007000000c2eb0b00000000000000000000000003000200a10f000000
interlay > assethub ok
all transaction tests are constructed ok!
Checking XCM channels
Checking open hrmp channels
assethub has open channels
checking hydradx channels
hydradx has open channels
test completed
The tests will check:
- drafting transactions and checking that they are encoded in the right way
- checking if each chain returns correct asset and native balance
Broadcast transactions:
Edit the src/tests/run_tests and set your seed in the get_test_account function.
Api tests
Build:
$ git clone https://github.com/XcmSend/api
$ cd api/
$ npm run buildme
Run tests:
$ npm run test

> xcmsend-api@1.0.0 test
> ts-node src/api/tests.ts

running api tests
starting connection test
trying to connect to Polkadot
Polkadot connection ok
trying to connect to HydraDX
HydraDX connection ok
trying to connect to Assethub
Assethub connection ok
connection test passed
Testing transaction routing
Checking polkadot > hydradx
route_tx start
polkadot:hydradx
handleTransfer for Polkadot to HydraDx...
cant connect
connect
drafting dot to hydradx
polkadot > hydradx ok
Checking hydradx > assethub
route_tx start
hydradx:assethub
handleTransfer for HydraDx to AssetHub...
hydradx > assethub ok
Checking polkadot > assethub
route_tx start
polkadot:assethub
handleTransfer for Polkadot to AssetHub...
polkadot > assethub ok
Checking hydradx > polkadot
route_tx start
hydradx:polkadot
handleTransfer for HydraDx to Polkadot...
hydradx > polkadot ok
Checking assethub > polkadot
route_tx start
assethub:polkadot
handleTransfer for AssetHub to Polkadot...
assethub > polkadot ok
Checking assethub > hydradx
route_tx start
assethub:hydradx
handleTransfer for AssetHub to HydraDx...
[assethub_to_hydra]
assethub > hydradx ok
transaction routing ok
testing hrmp channels
Checking HydraDX <> Assethub channels
hrmp channel test passed
broadcast_transaction start
generating tx..
route_tx start
polkadot:hydradx
handleTransfer for Polkadot to HydraDx...
cant connect
connect
drafting dot to hydradx
rawtx: 0xf404630803000100c91f0300010100f43376315face751ae6014e8a94301b2c27c0bc4a234e9997ed2c856d13d3d2f030400000000823801000000000000
Signature:  0x8d028400e229015b7907e059f566953b5970aac27c17521c59f32a972ba7204a29746d250152844175a0a3cbb8b14ba99c3ee5ffd3de1b7c11198c87c7dfb77ede9a20e173630a4e5c4840470a8ffd2583bc0b3148a6944446a61234f7488e9d7f662e6e8745000000630803000100c91f0300010100f43376315face751ae6014e8a94301b2c27c0bc4a234e9997ed2c856d13d3d2f030400000000823801000000000000
Verfied tx: 0x8d028400e229015b7907e059f566953b5970aac27c17521c59f32a972ba7204a29746d250152844175a0a3cbb8b14ba99c3ee5ffd3de1b7c11198c87c7dfb77ede9a20e173630a4e5c4840470a8ffd2583bc0b3148a6944446a61234f7488e9d7f662e6e8745000000630803000100c91f0300010100f43376315face751ae6014e8a94301b2c27c0bc4a234e9997ed2c856d13d3d2f030400000000823801000000000000
broadcast_transaction done
api tests finished
Json Api
XCMSend comes with a seperate json http api. That you can utilize to make third party integrations.
Git repo:
Build api
Requires:
- Npm(recommended version: 8.5.5)
- git
Clone:
$ git clone https://github.com/XcmSend/api
Build:
$ npm run buildme
Run:
$ npm run api
Api Documentation
DB:
Right now the API just use a simple key value inspired json file to store the diagram data, the file can be found at dist/src/api/urls2.json.
The format is {storage_key, compressed_diagramdata}
Reset db:
echo "{urls:[]}" > dist/src/api/urls2.json
Paths:
Path: /api/scenario/info;
Get information about a scenario.
Code:
$ curl -X POST -H "Content-Type: application/json" -d '{"id": "Uvervffcw"}' http://localhost:8080/api/scenario/info
$ {"result":"assetHub > xTransfer > polkadot"}
Path /api/scenario/info/full:
Code:
$ curl -X POST -H "Content-Type: application/json" -d '{"id": "SFdcb77BY"}' http://localhost:8080/scenario/info/full

$ {"result":{"tx":"0xa8042c0103000101000921009101030102009d1f0300a68db75204262bfc29aac76cd546e2500ba2acbd00","summary":"turing > xTransfer > moonriver","asset":"0","amount":"100","source_chain":"turing","dest_chain":"moonriver","txtype":"xTransfer"}}
Path: /api/scenario/create;
Create a new scenario.
Code:
$ curl -X POST -H "Content-Type: application/json" -d '{"source_chain": "turing", "dest_chain": "moonriver", "destination_address": "your address here", "amount": 100, "assetid": 0}' http://localhost:8080/api/scenario/create
$ {"result":"QWdI3KifK"}
After your scenario id is generated, you can import it in the ui:
http://localhost:5173/#/create/?diagramData=MY_SCENARIO_ID
/api/actions/swap/create:
Swap an asset using the HydraDx omnipool.
Code:
In this example we want to swap 10 amount of asset 0(HDX) for asset 5(DOT).
$ curl -X POST -H "Content-Type: application/json" -d '{"assetin": 0, "assetout": 5, "amount": 10 }' http://localhost:8080/api/actions/swap/create
{"success":true,"swap":{"swap_tx":"0xac043b05010000000500000000a0724e180900000000000000000000377d61b2850000000000000000000000","scenarioid":"IkwpZfaqF"}}
Sign and broadcast the swap_tx or view the scenario in our main UI with the scenarioid.
input:
- assetin
Number type, the asset id of the asset you want to convert from and have balance of.
- assetout
Number type, the asset id of the asset you want to recieve. The recieving assetid
- amount
Number type, Enter the amount you want to swaps of assetin asset. Note: if you want to exchange for example 10 dot, enter 10, do not enter the amount * token decimals. Enter the amount just like you would on any swap site.
/api/xcm/asset-transfer:
Info:
Transfer an on-chain asset from one polkadot connected parachain to another
Code example:
$ curl -X POST http://127.0.0.1:8080/api/xcm/asset-transfer   -H "Content-Type: application/json"   -d '{
    "sourchain": "assethub",
    "destchain": "hydradx",
    "assetid": "1984",
    "amount": 100,
    "destinationaddress": "7MinRZBqmh7SaJsNjsMuJHw3teB1Q834vvG1zSMPHQ2DQaAa"
  }'
Result:
{"txdata":"0xec04630803000100c91f0300010100b673e1853db0a7eb8a38e7a6309d0f5a39c29d929f586f7d5d1e588845e2895703040000000091010000000000"}
input:
- sourchain = assethub/hydradx/polkadot
- deschain = hydradx/polkadot/assethub
- assetid = id of asset to send
- amount = raw amount to send
- destination address = address of reciever on the destination chain
/api/hrmp/polkadot/openchannels
Info:
Check what hrmp channels are avaliable for a parachain connected to polkadot.
Code example:
curl -X POST -H "Content-Type: application/json" -d '{"paraid": 1000}' http://localhost:8080/api/hrmp/polkadot/openchannels
Result:
{"open_hrmp_channels":1001,1002,2000,2004,2006,2007,2011,2012,2013,2030,2031,2032,2034,2035,2040,2046,2048,2051,2094,2101,2104],"sourcechain":1000}
/api/template/call
Info:
Coming soon
/api/scenario/call
Info:
Coming soon
/api/chain/broadcast:
Information:
Broadcast a transaction using author submitextrinsics
input:
- chain = assethub/hydradx/polkadot
- tx = signed transaction
Testing broadcast:
Broadcast:
async function broadcast_transaction() {
    await cryptoWaitReady();
    console.log(`broadcast_transaction start`);
    console.log(`generating tx..`);
// set your account keys
    const alice = get_test_account();
    const pa_tx = (await route_tx('polkadot', 'hydradx', 0, 20000, '16XByL4WpQ4mXzT2D8Fb3vmTLWfHu7QYh5wXX34GvahwPotJ'));
    console.log(`rawtx:`, pa_tx.toHex());
    const api = await connectToWsEndpoint('polkadot');
    const signhere = await pa_tx.signAsync(alice);
    console.log(`Signature: `, signhere.toHex());
    const testo = api.tx(signhere); // this will break if the tx is invalid
    console.log(`Verfied tx:`, testo.toHex());
    const bhash = await broadcastToChain('polkadot', testo);
    console.log(`blockhash published: `, bhash.toString());
    console.log(`broadcast_transaction done`);
}
Configure the right key in get_test_account and run the tx signing:
tx_si start
generating tx..
route_tx start
polkadot:hydradx
handleTransfer for Polkadot to HydraDx...
cant connect
connect
drafting dot to hydradx
Creating tx
4
rawtx: 0xf404630803000100c91f0300010100f43376315face751ae6014e8a94301b2c27c0bc4a234e9997ed2c856d13d3d2f030400000000823801000000000000
Signature:  0x8d0284005400e2f7f5669b26998d8e4d3c1a2c8a2d0a9af827ca54a1cc3509105035c32e01286f7090ae34a1e3b8827ef9c035ede86a2b3e5c16bb6df072541327c7797d07e5934e245ae7c9ce199b2212fe559ff2df0a9ad1d66421aa3828223d8b2e9c8b45020400630803000100c91f0300010100f43376315face751ae6014e8a94301b2c27c0bc4a234e9997ed2c856d13d3d2f030400000000823801000000000000
Verfied tx: 0x8d0284005400e2f7f5669b26998d8e4d3c1a2c8a2d0a9af827ca54a1cc3509105035c32e01286f7090ae34a1e3b8827ef9c035ede86a2b3e5c16bb6df072541327c7797d07e5934e245ae7c9ce199b2212fe559ff2df0a9ad1d66421aa3828223d8b2e9c8b45020400630803000100c91f0300010100f43376315face751ae6014e8a94301b2c27c0bc4a234e9997ed2c856d13d3d2f030400000000823801000000000000
Copy the verified tx and curl it to the broadcast api:
curl -X POST -H "Content-Type: application/json" -d '{
  "chain": "polkadot",
  "tx": "0x8d0284005400e2f7f5669b26998d8e4d3c1a2c8a2d0a9af827ca54a1cc3509105035c32e01286f7090ae34a1e3b8827ef9c035ede86a2b3e5c16bb6df072541327c7797d07e5934e245ae7c9ce199b2212fe559ff2df0a9ad1d66421aa3828223d8b2e9c8b45020400630803000100c91f0300010100f43376315face751ae6014e8a94301b2c27c0bc4a234e9997ed2c856d13d3d2f030400000000823801000000000000"
}' http://127.0.0.1:8080/api/chain/broadcast
Result:
{"status":"broadcasted","hash":"0xf9b86cd2121c25685b5bbf9efffc5f6c81e7d3b568811860de36dccb09837d2b"}
Api client example Python flask
in this example we will create a simple python flask application to list open hrmp channels that are connected to a user defined parachain
Requirements:
- Python 3
- requests and flask(
$ pip3 install flask requests)
mkdir listchannels/
touch listchannels/app.py
Add the following to app.py:
from flask import Flask
import requests

app = Flask(__name__)

api_endpoint = "http://localhost:8080" # set the address of the api address


# Lets make a class to talk with the api
class handle_chain():
	def __init__(self):
		self.api = api_endpoint

	# check open hrmp channels based on source paraid
	def check_openchannels(self, paraid):
		return requests.post(self.api+'/polkadot/openchannels', json={"paraid": paraid}).json()

	# interact with a premade scenario
	def call_scenario(self, scenarioid, calldata):
		return requests.post(self.api+'/call/scenario', json={"data":calldata}).text

# create the /hrmp/openchannels/chain page
@app.route('/hrmp/openchannels/<chain>/', methods=['GET'])
def chain_channels(chain):
	# configure chain name and map it to paraid
	some_chains = {'acala': 2000, 'assethub':1000 , 'hydradx': 2034}
	# verify user input
	if not some_chains.keys().__contains__(chain.lower()):
		return flask.redirect('/', code=301)
	# create a string buffer we will use to write the html to
	output = ""
	channels = handle_chain().check_openchannels(some_chains.get(chain.lower()))
	for channel in channels.get('open_hrmp_channels', []):
		output += "<p>Chain: {}</p></br>".format(channel)
	# return our html string, if this is a production app we should configure a static template and render it with flask.render_template
	return '<html><body><center>{} is connected to chains: {}</body></html>'.format(chain.title(), output)


@app.route('/')
def hello():
    return 'Visit /hrmp/openchannels/assethub/'


if __name__ == "__main__":
	# configure runtime variables such as port and host
	app.run(host='0.0.0.0', port=8081)
Run it:
$ python3 app.py
DOT > USDT
in order to convert DOT to USDT a user is currently required to perfom 3 different actions, with xcmsend we can lower it to 1 action.
Ways of converting DOT(polkadot) to USDT on assethub
- 1: polkadot DOT > hydradx > hydradx swap > assethub
With XCMSend:
1: Go to app.xcmsend.com and draft the tx:

Without XCMSend:
1: bridge dot to hydra: https://app.hydradx.io/
2: Swap DOT for USDT: https://app.hydradx.io/trade/swap
3: bridge usdt to assethub: https://app.hydradx.io/cross-chain
Reference: How I swapped my DOT to USDT
- 2(coming soon): polkadot DOT > moonbeam > moonbeam swap > assethub
Links:
Polkadot-JS UI: How to xTransfer DOT or KSM to Asset Hub
Make your own dapp
In this tutorial, we will go through the process how anyone can make cross chain dapps very easily with XCMSend and the XCMSend api.
Drag and drop together a transaction from with XCMSend
Drag and drop your transaction flow
/call/scenario
Create a frontend for your application:
Python flask example:
Typescript example:
Discord Bot
On our discord instance, you can utilize the BagpipeBOT for creating workflows, displaying workflow info and getting important links.
If you want to use the Bagpipes Bot on your own discord server, feel free to reach out to us on Bagpipes discord server
BagpipesBot now supports slash commands!
With Bagpipes bot, community can quickly generate a scenario and view it on the public Bagpipes instance:
https://alpha.bagpipes.io
Solve problems:
How do I transfer a token from chain a to b with XCM?
Solve "Jaspers" use case
The bot allows you to generate a scenario id that you can view visually using the link.
Join Bagpipes discord server:

Backend:
The discord bot is using our api endpoint located at: api.bagpipes.io .
Read how to use the bot on the next page.
Bot commands
The bot reacts on keywords and commands.
Scenario info:
Using the public interface( alpha.bagpipes.io ) you can drag and drop together a scenario:

Go to the /lab view and copy the link:

Paste the link into the #bot channel:

Note: you can use the slash command or just paste the copied link into the chat for the bot to display the information.
Slash command: /scenario_info copied_link_here

Create swaps
Swap one asset on HydraDx for another using Omnipool.
Slash command: /swap source_asset dest_asset amount


Create scenarios
Send an asset from one chain to another with an XCM asset transfer.
Slash command: /xcm-transfer source_chain dest_chain
User examples:
Send 20 of asset 1:
/xcm-transfer polkadot assethub 1 20
![]()

Get links:
Request the most up to date Bagpipes project links from the bot.
Documentation:
> flipchan: whats the api documentation?
> BagpipesBot:
Here is a link to the documentation for the API: https://xcmsend.github.io/api/docs.html
Github:
> user: What's the github link?
> BagpipesBot: Github repo: https://github.com/XcmSend/
/github-link
Displays github repo link with a slash command.
Schedule transactions on Polkadot
Note this feature is still in development and can be accessed by: using the 'scheduler' branch in the main app repo.
Intro:
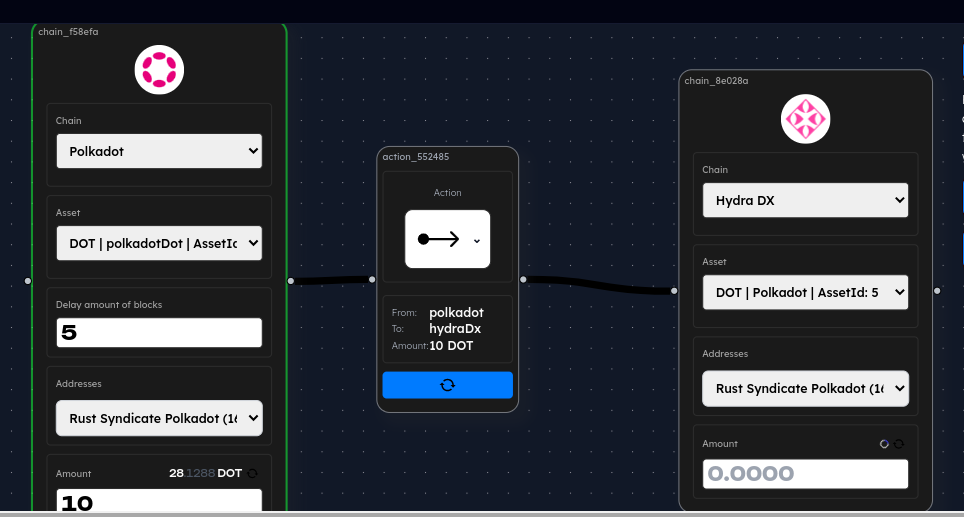
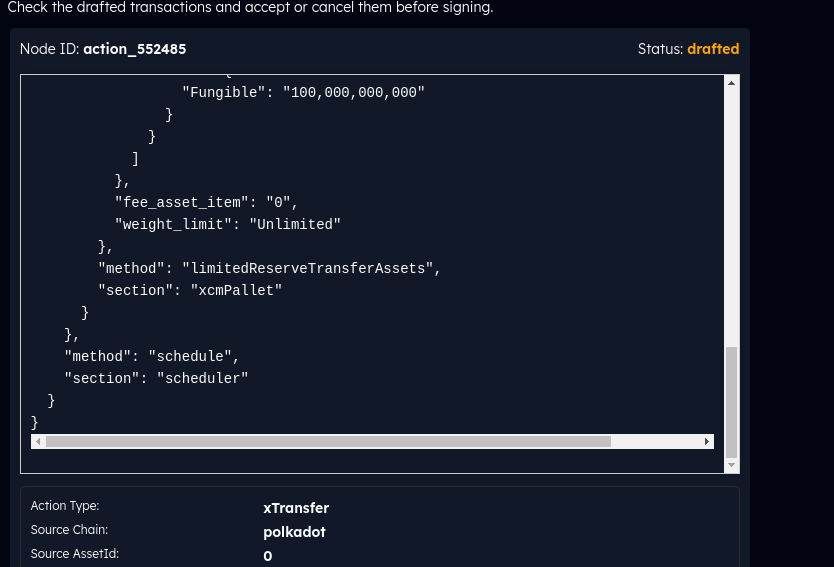
If you select Polkadot as the source chain, you will be prompted for a block delay option.
The block delay will delay your transaction with the amount of blocks you enter. If you eeneter 0, your transaction will not be scheduled.
Tech specs:
The transaction is delayed using the scheduler pallet and delays it the amount of blocks the user has set.
Supported direction:
- Polkadot > Assethub
- Polkadot > HydraDX
$DED memecoin - Rococo testnet
Rococo ROC to Rococo Assethub transfers! A fun new meme token is being launched in the Polkadot ecosystem. Since we both want to release a fun christmas feature and support $DED, we made a fun animation.

Get ROC testnet tokens:
Rococo blockexplorer:
Bagpipes template link:
Note:
XCM on Rococo can be unstable is and we are not affiliated with the $DED token. This is a tech demo to show Rococo testnet XCM transfers.
It's easier to check if the ROC was sent successfully using the Polkadot.js for Rococo Assethub link.